前端集成:在Next.js中实现授权
在本系列文章的第一部分,我们使用Appwrite实现了后端,安装了一些依赖项,并设置了Permit来处理授权和基于角色的访问控制。
现在让我们看看如何将前端与后端集成,构建一个功能完整的EdTech SaaS应用。
前端集成:在Next.js中实现授权
既然您已经使用Permit实现了后端授权,现在将其集成到Next.js前端中。前端应该:
- 从后端获取用户权限以控制用户可以看到和操作的内容
- 确保API请求遵守基于角色的访问控制(RBAC)
- 对未授权用户隐藏UI元素(例如,防止学生看到"创建作业")
1. 设置带授权的API调用
由于只有后端强制执行权限,您的前端从不直接决定访问权限——而是:
- 向后端发送请求
- 等待后端的授权响应
- 相应地显示数据或UI元素
要开始,您需要在计算机上安装Node.js。
然后按照以下步骤操作:
1
2
|
npx create-next-app@latest frontend
cd frontend
|
2. 初始化shadcn
创建Next.js项目后,您会注意到Tailwind CSS v4已经为您安装好了,这意味着您不需要做任何其他事情。因为我们使用组件库,我们将安装Shadcn UI。
要这样做,我们需要运行init命令在文件夹根目录创建components.json文件:
初始化后,您可以开始向项目添加组件:
1
|
npx shadcn@latest add button card dialog input label table select tabs
|
如果询问是否因为Nextjs 15版本与shadcn的兼容性而使用force,请按Enter继续。
3. 安装所需包
安装以下包:
1
2
|
npm i lucide-react zustand
npm i --save-dev axios
|
现在我们已经安装了构建应用程序所需的一切,可以开始创建其他组件和路由了。
为了保持整个应用程序的UI一致性,将此代码粘贴到您的global.css文件中(粘贴在tailwindcss导入下方):
 1
 2
 3
 4
 5
 6
 7
 8
 9
10
11
12
13
14
15
16
17
18
19
20
21
22
23
24
25
26
27
28
29
30
31
32
33
34
35
36
37
38
39
40
41
42
43
44
45
46
47
48
49
50
51
52
53
54
|
@layer base {
  :root {
    --background: 75 29% 95%;     /* Light beige background */
    --foreground: 0 0% 9%;        /* Dark grey/black text */

    --card: 0 0% 100%;            /* Pure white (card background) */
    --card-foreground: 0 0% 9%;   /* Dark grey/black text */

    --popover: 0 0% 99%;          /* Slight off-white (popover) */
    --popover-foreground: 0 0% 9%;/* Dark grey/black text */

    --primary: 0 0% 0%;           /* Black (primary headings) */
    --primary-foreground: 60 100% 100%; /* White text on primary */

    --secondary: 75 31% 95%;      /* Light grey (used in sections) */
    --secondary-foreground: 0 0% 9%;/* Dark grey/black text */

    --muted: 69 30% 95%;          /* Grey (muted text) */
    --muted-foreground: 0 0% 45%;   /* Medium grey (borders/lines) */

    --accent: 252 29% 97%;        /* Slightly bluish grey (UI elements) */
    --accent-foreground: 0 0% 9%;   /* Dark grey/black text */

    --destructive: 0 84.2% 60.2%;   /* Red (for destructive actions) */
    --destructive-foreground: 0 0% 98%; /* Light text on destructive */

    --border: 189 0% 45%;         /* Medium grey (borders/lines) */
    --input: 155 0% 45%;          /* Grey input borders */
    --ring: 0 0% 0%;              /* Black for focus rings */

    --radius: 0.5rem;
  }
}

@layer base {
  * {
    @apply border-border;
  }
  body {
    @apply bg-background text-foreground;
  }
}
body {
  font-family: Arial, Helvetica, sans-serif;
}

@layer base {
  * {
    @apply border-border outline-ring/50;
  }
  body {
    @apply bg-background text-foreground;
  }
}
|
4. 组件文件
创建以下组件文件并粘贴相应的代码:
AddAssignmentDialog.tsx文件:
  1
  2
  3
  4
  5
  6
  7
  8
  9
 10
 11
 12
 13
 14
 15
 16
 17
 18
 19
 20
 21
 22
 23
 24
 25
 26
 27
 28
 29
 30
 31
 32
 33
 34
 35
 36
 37
 38
 39
 40
 41
 42
 43
 44
 45
 46
 47
 48
 49
 50
 51
 52
 53
 54
 55
 56
 57
 58
 59
 60
 61
 62
 63
 64
 65
 66
 67
 68
 69
 70
 71
 72
 73
 74
 75
 76
 77
 78
 79
 80
 81
 82
 83
 84
 85
 86
 87
 88
 89
 90
 91
 92
 93
 94
 95
 96
 97
 98
 99
100
101
102
|
"use client"

import type React from "react"

import { useState } from "react"
import { Button } from "@/components/ui/button"
import { Input } from "@/components/ui/input"
import { Label } from "@/components/ui/label"
import {
  Dialog,
  DialogContent,
  DialogDescription,
  DialogFooter,
  DialogHeader,
  DialogTitle,
} from "@/components/ui/dialog"
import { Assignment } from "@/types"

interface AddAssignmentDialogProps {
  open: boolean
  onOpenChange: (open: boolean) => void
  onAddAssignment: (data: Assignment) => void
  creatorEmail: string
}

export function AddAssignmentDialog({ open, onOpenChange, onAddAssignment, creatorEmail }: AddAssignmentDialogProps) {
  const [title, setTitle] = useState("")
  const [subject, setSubject] = useState("")
  const [teacher, setTeacher] = useState("")
  const [className, setClassName] = useState("")
  const [dueDate, setDueDate] = useState("")

  const handleSubmit = (e: React.FormEvent) => {
    e.preventDefault()
    // 通常您会将此数据发送到后端
    const newAssignment = { title, subject, teacher, className, dueDate, creatorEmail }
    onAddAssignment(newAssignment)
    console.log("New assignment:", { title, subject, class: className, dueDate, creatorEmail })
    onOpenChange(false)
  }

  return (
    <Dialog open={open} onOpenChange={onOpenChange}>
      <DialogContent>
        <DialogHeader>
          <DialogTitle>添加新作业</DialogTitle>
          <DialogDescription>
            在此输入新作业的详细信息。完成后点击保存。
          </DialogDescription>
        </DialogHeader>
        <form onSubmit={handleSubmit}>
          <div className="grid gap-4 py-4">
            <div className="grid grid-cols-4 items-center gap-4">
              <Label htmlFor="title" className="text-right">
                标题
              </Label>
              <Input id="title" value={title} onChange={(e) => setTitle(e.target.value)} className="col-span-3" />
            </div>
            <div className="grid grid-cols-4 items-center gap-4">
              <Label htmlFor="subject" className="text-right">
                科目
              </Label>
              <Input id="subject" value={subject} onChange={(e) => setSubject(e.target.value)} className="col-span-3" />
            </div>
            <div className="grid grid-cols-4 items-center gap-4">
              <Label htmlFor="teacher" className="text-right">
                教师
              </Label>
              <Input id="teacher" value={teacher} onChange={(e) => setTeacher(e.target.value)} className="col-span-3" />
            </div>
            <div className="grid grid-cols-4 items-center gap-4">
              <Label htmlFor="class" className="text-right">
                班级
              </Label>
              <Input
                id="class"
                value={className}
                onChange={(e) => setClassName(e.target.value)}
                className="col-span-3"
              />
            </div>
            <div className="grid grid-cols-4 items-center gap-4">
              <Label htmlFor="dueDate" className="text-right">
                截止日期
              </Label>
              <Input
                id="dueDate"
                type="date"
                value={dueDate}
                onChange={(e) => setDueDate(e.target.value)}
                className="col-span-3"
              />
            </div>
          </div>
          <DialogFooter>
            <Button type="submit">保存更改</Button>
          </DialogFooter>
        </form>
      </DialogContent>
    </Dialog>
  )
}
|
此文件定义了一个React组件AddAssignmentDialog,它渲染一个用于添加新作业的对话框表单。它使用useState管理表单状态,并通过onAddAssignment属性将作业数据提交给父组件。对话框包括标题、科目、教师、班级和截止日期的输入字段,并在提交后关闭。
AddStudentDialog.tsx文件:
  1
  2
  3
  4
  5
  6
  7
  8
  9
 10
 11
 12
 13
 14
 15
 16
 17
 18
 19
 20
 21
 22
 23
 24
 25
 26
 27
 28
 29
 30
 31
 32
 33
 34
 35
 36
 37
 38
 39
 40
 41
 42
 43
 44
 45
 46
 47
 48
 49
 50
 51
 52
 53
 54
 55
 56
 57
 58
 59
 60
 61
 62
 63
 64
 65
 66
 67
 68
 69
 70
 71
 72
 73
 74
 75
 76
 77
 78
 79
 80
 81
 82
 83
 84
 85
 86
 87
 88
 89
 90
 91
 92
 93
 94
 95
 96
 97
 98
 99
100
101
102
103
104
105
106
107
108
109
110
111
112
113
114
115
116
117
118
119
120
121
122
123
124
125
126
127
128
129
130
131
132
133
134
135
136
|
'use client'

import { useState } from 'react'
import { Button } from '@/components/ui/button'
import { Input } from '@/components/ui/input'
import { Label } from '@/components/ui/label'
import {
  Dialog,
  DialogContent,
  DialogDescription,
  DialogFooter,
  DialogHeader,
  DialogTitle,
} from '@/components/ui/dialog'
import {
  Select,
  SelectContent,
  SelectItem,
  SelectTrigger,
  SelectValue,
} from "@/components/ui/select"
import { Student } from '@/types'

interface AddStudentDialogProps {
  open: boolean
  onOpenChange: (open: boolean) => void
  onAddStudent: (data: Student) => void
  loading: boolean
  creatorEmail: string
}

export function AddStudentDialog({ open, onOpenChange, onAddStudent, loading, creatorEmail }: AddStudentDialogProps) {
  const [firstName, setFirstName] = useState('')
  const [lastName, setLastName] = useState('')
  const [className, setClassName] = useState('')
  const [gender, setGender] = useState('')
  const [age, setAge] = useState("")

  const handleSubmit = (e: React.FormEvent) => {
    e.preventDefault()
    // 通常您会将此数据发送到后端
    onAddStudent({
      firstName,
      lastName,
      className,
      gender,
      age: Number(age),
      creatorEmail
    })
    console.log('New student:', { firstName, lastName, className, gender, age })
    onOpenChange(false)
  }

  return (
    <Dialog open={open} onOpenChange={onOpenChange}>
      <DialogContent>
        <DialogHeader>
          <DialogTitle>添加新学生</DialogTitle>
          <DialogDescription>
            在此输入新学生的详细信息。完成后点击保存。
          </DialogDescription>
        </DialogHeader>
        <form onSubmit={handleSubmit}>
          <div className="grid gap-4 py-4">
            <div className="grid grid-cols-4 items-center gap-4">
              <Label htmlFor="firstName" className="text-right">
                名字
              </Label>
              <Input
                id="firstName"
                value={firstName}
                onChange={(e) => setFirstName(e.target.value)}
                className="col-span-3"
              />
            </div>
            <div className="grid grid-cols-4 items-center gap-4">
              <Label htmlFor="lastName" className="text-right">
                姓氏
              </Label>
              <Input
                id="lastName"
                value={lastName}
                onChange={(e) => setLastName(e.target.value)}
                className="col-span-3"
              />
            </div>
            <div className="grid grid-cols-4 items-center gap-4">
              <Label htmlFor="class" className="text-right">
                班级
              </Label>
              <Input
                id="class"
                value={className}
                onChange={(e) => setClassName(e.target.value)}
                className="col-span-3"
              />
            </div>
            <div className="grid grid-cols-4 items-center gap-4">
              <Label htmlFor="gender" className="text-right">
                性别
              </Label>
              <Select onValueChange={setGender} value={gender}>
                <SelectTrigger className="col-span-3">
                  <SelectValue placeholder="选择性别" />
                </SelectTrigger>
                <SelectContent>
                  <SelectItem value="boy">男孩</SelectItem>
                  <SelectItem value="girl">女孩</SelectItem>
                </SelectContent>
              </Select>
            </div>
            <div className="grid grid-cols-4 items-center gap-4">
              <Label htmlFor="age" className="text-right">
                年龄
              </Label>
              <Input
                id="age"
                type="number"
                step="0.1"
                value={age}
                min={"4"}
                max={"99"}
                placeholder='输入有效年龄'
                onChange={(e) => setAge(e.target.value)}
                className="col-span-3"
              />
            </div>
          </div>
          <DialogFooter>
            <Button disabled={loading} type="submit">{loading ? "保存中..." : "保存更改"}</Button>
          </DialogFooter>
        </form>
      </DialogContent>
    </Dialog>
  )
}
|
此文件定义了一个React组件AddStudentDialog,它渲染一个用于添加新学生的对话框表单。它使用useState管理表单状态,并通过onAddStudent属性将学生数据提交给父组件。对话框包括名字、姓氏、班级、性别(带下拉菜单)和年龄的输入字段,并处理提交期间的加载状态。
AssignmentsTable.tsx文件:
 1
 2
 3
 4
 5
 6
 7
 8
 9
10
11
12
13
14
15
16
17
18
19
20
21
22
23
24
25
26
27
28
29
30
31
32
|
import { Table, TableBody, TableCaption, TableCell, TableHead, TableHeader, TableRow } from "@/components/ui/table"
import type { AssignmentsTable } from "@/types"

export function AssignmentsTables({ assignments }: { assignments: AssignmentsTable[] }) {
  console.log("Assignments", assignments)

  return (
    <Table>
      <TableCaption>最近作业列表</TableCaption>
      <TableHeader>
        <TableRow>
          <TableHead>标题</TableHead>
          <TableHead>科目</TableHead>
          <TableHead>班级</TableHead>
          <TableHead>教师</TableHead>
          <TableHead>截止日期</TableHead>
        </TableRow>
      </TableHeader>
      <TableBody>
        {assignments.map((assignment) => (
          <TableRow key={assignment.$id}>
            <TableCell>{assignment.title}</TableCell>
            <TableCell>{assignment.subject}</TableCell>
            <TableCell>{assignment.className}</TableCell>
            <TableCell>{assignment.teacher}</TableCell>
            <TableCell>{assignment.dueDate}</TableCell>
          </TableRow>
        ))}
      </TableBody>
    </Table>
  )
}
|
此文件定义了一个React组件AssignmentsTables,它渲染一个表格来显示作业列表。它接受一个作业数组作为属性,并遍历它们以填充表格行,包含标题、科目、班级、教师和截止日期等详细信息。表格包括标题和表头以提高可读性。
auth-layout.tsx文件:
 1
 2
 3
 4
 5
 6
 7
 8
 9
10
11
12
13
14
15
16
17
18
19
20
21
22
23
24
25
26
27
28
29
30
31
32
33
34
35
36
37
|
import type React from "react"
interface AuthLayoutProps {
children: React.ReactNode
title: string
description?: string
}
export function AuthLayout({ children, title, description }: AuthLayoutProps) {
return (
<div className="min-h-screen grid lg:grid-cols-2">
{/* 左侧 - 表单 */}
<div className="flex items-center justify-center p-8">
<div className="mx-auto w-full max-w-sm space-y-6">
<div className="space-y-2 text-center">
<h1 className="text-3xl font-bold tracking-tight">{title}</h1>
{description && <p className="text-sm text-muted-foreground">{description}</p>}
</div>
{children}
</div>
</div>
{/* 右侧 - 图片 */}
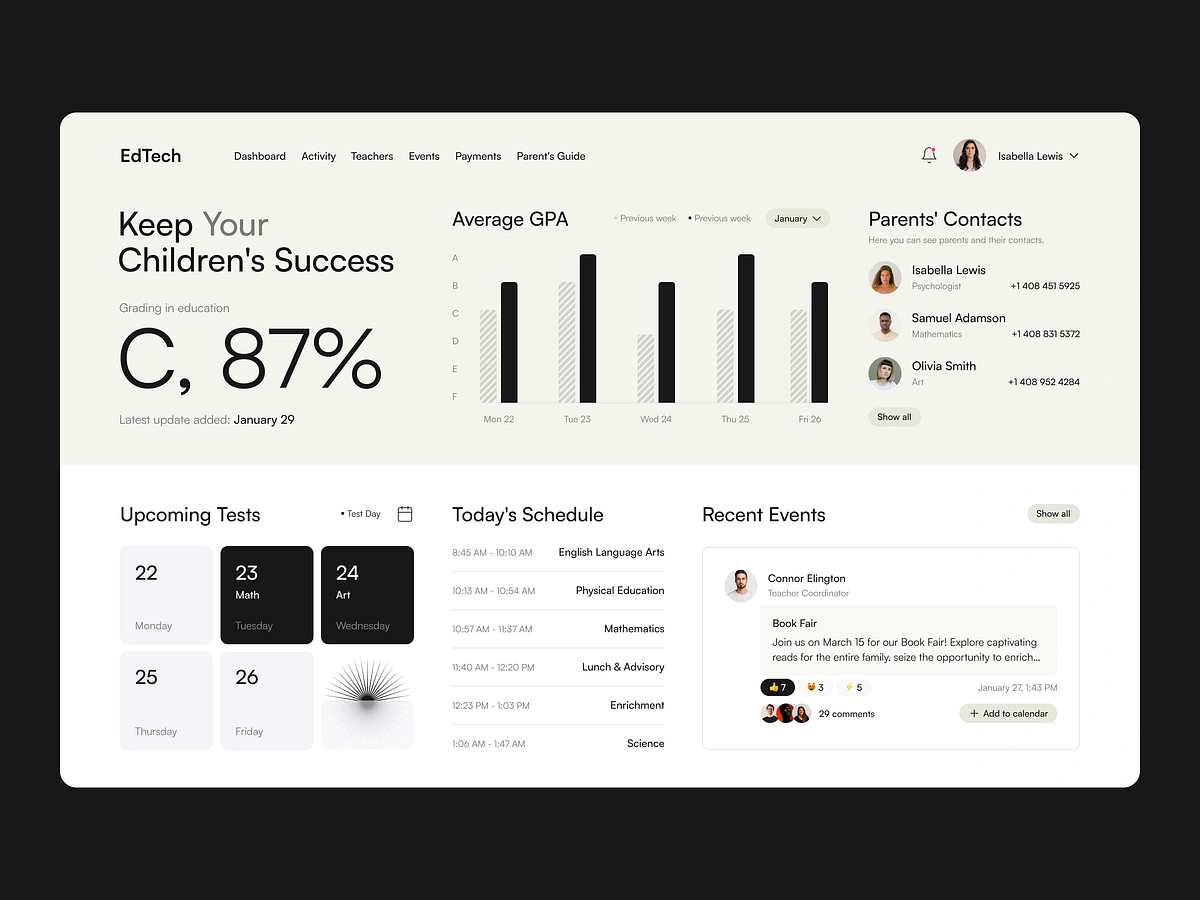
<div className="hidden lg:block relative bg-black">
<div className="absolute inset-0 bg-[url('https://hebbkx1anhila5yf.public.blob.vercel-storage.com/image-xOOAKcDxPyvxlDygdNGtUvjEA6QHBO.png')] bg-cover bg-center opacity-50" />
<div className="relative h-full flex items-center justify-center text-white p-12">
<div className="space-y-6 max-w-lg">
<h2 className="text-4xl font-bold">Keep Your Children's Success</h2>
<p className="text-lg text-gray-200">
Connect with teachers, track progress, and stay involved in your child's education journey.
</p>
</div>
</div>
</div>
</div>
)
}
|
此文件定义了一个React组件AuthLayout,它为认证页面提供布局。它包括左侧用于表单(带标题和可选描述),右侧带有背景图片和激励文本。该布局是响应式的,在较小屏幕上隐藏图片。
Features.tsx文件:
 1
 2
 3
 4
 5
 6
 7
 8
 9
10
11
12
13
14
15
16
17
18
19
20
21
22
23
24
25
26
27
28
29
30
31
|
import { Book, BarChart, MessageCircle } from "lucide-react"

const features = [
  {
    name: "综合仪表板",
    description: "查看学生的整体学业表现,包括平均成绩和随时间进展。",
    icon: BarChart,
  },
  {
    name: "轻松沟通",
    description: "学校管理员和教师之间的直接消息系统,实现快速高效沟通。",
    icon: MessageCircle,
  },
  {
    name: "学业跟踪",
    description:
      "监控作业、即将到来的考试和项目截止日期,帮助您的学生掌握学习进度。",
    icon: Book,
  },
]

export function Features() {
  return (
    <div className="py-12 bg-white" id="features">
      <div className="max-w-7xl mx-auto px-4 sm:px-6 lg:px-8">
        <div className="lg:text-center">
          <h2 className="text-base text-primary font-semibold tracking-wide uppercase">功能</h2>
          <p className="mt-2 text-3xl leading-8 font-extrabold tracking-tight text-gray-900 sm:text-4xl">
            保持联系所需的一切
          </p>
          <p className="mt-4 max-w-2xl text-xl text-gray-500 lg:mx-auto">
|